How to Protect Your USB by Encrypting?
It is time Secure Your Precious Data. ??
Protecting data on USB is important for a few reasons. Though it is easy to carry anywhere, there are chances you can lose it or even someone accidentally walk away with it. In addition, the type of information you want to always have handy could include sensitive items, such as medical or financial info.
Contents
What is Encryption?
Encryption, is the process of changing information in such a way as to make it unreadable by anyone except those possessing special knowledge (usually referred to as a “key”) that allows them to change the information back to its original, readable form.
Encryption does not itself prevent interference but denies the intelligible content to a would-be interceptor. In an encryption scheme, the intended information or message, referred to as plaintext, is encrypted using an encryption algorithm – a – generating ciphertext that can be read only if decrypted.
For technical reasons, an encryption scheme usually uses a pseudo-random encryption key generated by an algorithm. It is in principle possible to decrypt the message without possessing the key, but, for a well-designed encryption scheme, considerable computational resources and skills are required. An authorized recipient can easily decrypt the message with the key provided by the originator to recipients but not to unauthorized users.
Why Use Encryption?
Encryption is important because it allows you to securely protect data that you don’t want anyone else to have access to. Businesses use it to protect corporate secrets, governments use it to secure classified information, and many individuals use it to protect personal information to guard against things like identity theft.
VeraCrypt
In this article you’ll learn how to use VeraCrypt to secure a USB drive.
Special Features of VeraCrypt
VeraCrypt main features:
- Creates a virtual encrypted disk within a file and mounts it as a real disk.
- Encrypts an entire partition or storage device such as USB flash drive or hard drive. It supports encrypting not just files, but also folders, disk partitions, or even entire drives.
- Encrypts a partition or drive where Windows is installed (pre-boot authentication).
- Encryption is automatic, real-time(on-the-fly) and transparent.
- It operates “on-the-fly,” meaning you won’t always be waiting for a decryption process to finish before you can use your data. Once you open an encrypted volume (more on this later), it works seamlessly.
- Parallelization and pipelining allow data to be read and written as fast as if the drive was not encrypted.
- Encryption can be hardware-accelerated on modern processors.
- Provides plausible deniability, in case an adversary forces you to reveal the password: Hidden volume (steganography) and hidden operating system.
- It’s cross-platform on desktop systems, meaning you can use it on Windows, macOS, or Linux.
- More information about the features of VeraCrypt may be found in the documentation.
How to Install VeraCrypt?
VeraCrypt is free open-source disk encryption software for Windows, Mac OSX and Linux. Click here to Install VeraCrypt for your desired operating system.
The installation is simple and just takes few clicks to install it.
How to Set Up Encryption for a USB Drive?
Step 1 – Once installed, launch VeraCrypt by double-clicking the file VeraCrypt.exe or by clicking the VeraCrypt shortcut in your Windows Start menu.
Step 2 – Create Volume

Step 3 – A wizard will lead you through the install. First, you’ll choose whether you want to create a “container” (sort of a vault-in-a-file), or to use an entire partition/disk. Select the Encrypt a non-system partition/drive option, then click Next.

Step 4 – Select Standar VeraCrypt Volume. Click Next.

Step 5 – Select the Partition or Device (USB). Click OK. Click Next.
NOTE: Be very careful you select the correct one (not any of your Hard Disk Partition), as creating the volume will erase everything on the disk. The wizard will show you a warning message to this effect.

Step 6 – Create Encrypted Volume and Format it.
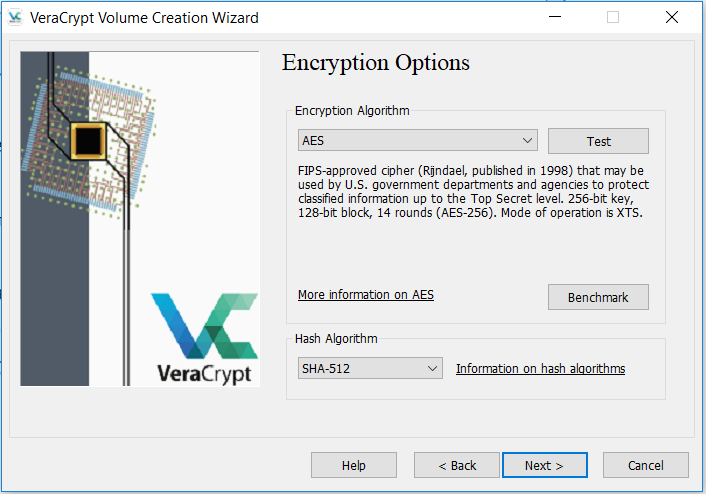
Step 7 – You’ll now be asked what kind of encryption you want to use. Explaining the nuances of each one of these is beyond the scope of this article (or any single article, probably). The default values (AES for the Encryption Algorithm and SHA-512 for the Hash Algorithm) are more than enough. The time and effort required to even try to crack the encryption wouldn’t be worth it.
Click Next.
Step 8 – Click Next and Proceed with the Volume Size Tab.
Step 9 – Now you’ll need to pick a password for the device. Take a moment to read the note on what constitutes a good password (hint: mypassword123 is not a good password). Make sure it’s something you’ll remember as well. If you forget it, you’ll have just as much luck trying to retrieve your data as the would-be criminals (not much!) You can ignore the check boxes here, there are other ways to secure the data, but for the purposes of this portable device they’ll make things more difficult.
Click Next once you’re done.

Step 10 – Next Step depends upon the size of your USB. Click Next to Proceed.

Step 11 – Now the installer will start creating the encryption key. It needs some random data to do this, and the way it does so is by capturing your mouse movements. Start moving your cursor around the window; you’ll notice the progress bar starting to fill up.
Once it’s complete, you can click Format to start encrypting your drive.

Yahoo! your encrypted device is ready. Click Exit to close the wizard. Normal Formatting will take some time.
How to Mount and Use your Encrypted USB?
Now that everything is secure, you need to use VeraCrypt to mount the drive onto your system in order to use your it. This means VeraCrypt is taking the encrypted physical device, and hooking it up to a location on your PC to look like a “regular” drive. You read data from and write data to this “regular” drive, and behind the scenes, VeraCrypt de-/encrypts it on the fly.
We will return to the main VeraCrypt window (which should still be open, but if it is not, launch it again).
First, notice there are a list of drive letters in the grid at the top. Drive letters already assigned to other devices (such as your main C: drive, or a secondary hard drive on a letter like D: or E:) don’t show up here, only free ones. Select one of these (we selected R:) — this is where the encrypted drive will be mounted.
On macOS and Linux, the drive letters are replaced by numbers, and the mount point will be a standard file path.

Next, click the Select Device, Select the USB drive and click Mount. Enter your Password (you just created) and you are done.
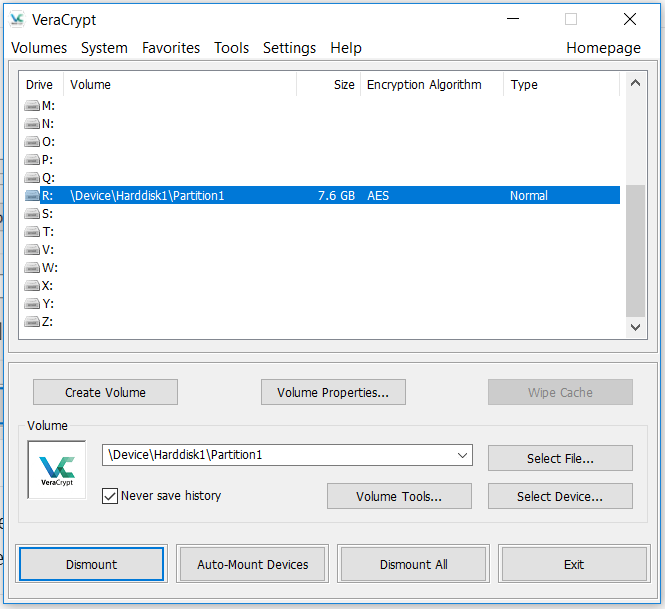
At this point, you can close the VeraCrypt window, although it will keep running in the system tray.
You can now copy, paste, open, save, and otherwise do all manner of file-related things securely. But remember to use the mounted drive now (R: in our example). Your OS will likely tell you it can’t read the physical drive. This is what you want — everything’s encrypted.
When you’re done using your thumb drive, just select it in VeraCrypt and click Unmount. That’s all there is to it: USB thumb drive security made simple.
(Video Tutorial) How to ?Protect Your USB by Encryption? [Urdu/Hindi/English Subtitles]
![How to ?Protect Your USB by Encryption? [Urdu/Hindi/English Subtitles]](https://i.ytimg.com/vi/dsmi9nrSPCA/hqdefault.jpg)